Creating a blog might seem like a daunting task, and you might not know where to begin. Truth be told, it's very easy to create a blog (for free), and you can do it in under an hour by following these four simple steps. What are you waiting for?
Start a Free Blog at Blogger.com
Step 1: Sign Up to Create a Blog at Blogger.com
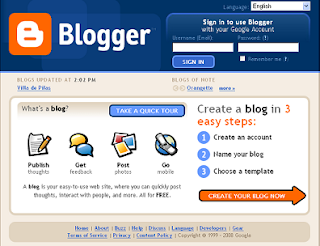
Visit the Blogger.com home page and select the "Create Your Blog Now" button to begin the process to start your new Blogger.com blog.
Step 2: Create a Google Account

If you don't already have a Google account, you'll need to create one by completing the form on this page.
Step 3: Sign In with Your Google Account

Step 4: Name Your New Blog

Enter the blog name and corresponding domain name.
Step 5: Choose a Template

Step 6: Congratulations - Your New Blog is Active!

Your blog is ready for you
Step 7: Write Your First Post

You're now ready to write your first blog post in your new Blogger.com blog.
Start a Free Blog in Wordpress
Step 1: Sign Up for a Free Wordpress Account

Visit the Wordpress home page and select the 'Sign Up' button to register for a Wordpress account. You'll need a valid email address to sign up for a new Wordpress account.
Step 2: Enter Information to Create Your Free Wordpress Account

To sign up for a Wordpress account, you'll be prompted to enter a username and password of your choosing. You'll also be asked to confirm that you've read the terms and conditions of the Wordpress website. Finally, you'll be asked whether you want to create a blog or simply a Wordpress account.
Step 3: Enter Information to Create Your New Wordpress Blog

Step 4: Congratulations - Your Account is Active!
Once you have successfully completed the 'Create Your Blog' step, you'll see a screen that tells you your Wordpress account is active and to look for an email confirming your login information.
Step 5: An Overview of Your Wordpress User Dashboard

When you log into your newly created Wordpress blog, you'll be taken to your user dashboard. From here, you can change your blog's theme (design), write posts and pages, add users, revise your own user profile, update your blogroll, and more. Take some time to explore your Wordpress dashboard, and don't be afraid to test out the various tools and features available to you to help customize your blog. If you have any problems, click on the 'Support' tab in the upper right corner of your screen. This will take you to the online help section of Wordpress as well as the active user forums where you can ask questions
Step 6: Overview of the Wordpress Dashboard Toolbar

The Wordpress dashboard toolbar will help you navigate through your blog's administration pages to do everything from writing posts and moderating comments to modifying your blog's themes and customizing your sidebars. Take some time to press all the tabs on your dashboard's toolbar and explore the pages you find to learn all the cool things you can do in Wordpress!
Step 7: Choosing a Theme for Your New Wordpress Blog

Different themes offer different levels of customization. For example, some themes allow you to upload a custom header for your blog, and each theme offers various widgets you can select from to use in your sidebar. Have fun experimenting with the different options available to you.
Step 8: An Overview of Wordpress Widgets and Sidebars

Wordpress provides a variety of ways to customize your blog's sidebars through the use of widgets. You can find the 'Widgets' tab under the 'Presentation' tab of your main Wordpress dashboard toolbar. You can use widgets to add RSS tools, search tools, text boxes for ads and more. Explore the widgets available in the Wordpress dashboard and find the ones that enhance your blog the best.
Step 9: You're Ready to Write Your First Wordpress Blog Post

Hi there, I enjoy reading all of your article.
ReplyDeleteI wanted to write a little comment to support you.
my website ... Free Minecraft
Attractive section of content. I just stumbled upon your site and in accession capital to assert that I
ReplyDeleteget in fact enjoyed account your blog posts. Any way I'll be subscribing to your augment and even I achievement you access consistently quickly.
Here is my website sharecash